Intro: How To Paint A Kayak

Well now, let’s get right into the fun part, shall we? Painting a kayak! If done right, it’s a brilliant way to breathe a whole new life into your trusty vessel. Not to mention, it could be a great avenue to showcase your personal style. How cool would it be to paddle in a kayak that’s a reflection of you, eh?
First things first, you’ve got to round up all the materials you’ll see mentioned throughout this guide. As a general rule of thumb, you’ll need the paint of course–opt for a kind that’s marine grade or at least labeled for outdoor use. This way your masterpiece can withstand the great outdoors. You’ll also need some primer to create an even, receptive surface on which to apply the fabulous color you’ve chosen. Ah, you’ll also need strong cleaner–something like denatured alcohol could work. Grab sandpaper or a sanding block to buff away those imperfections. And don’t forget protective gear–you want to be safe, not sorry!
But listen here, before you dive into turning your kayak into a canvass, there is a critical step you should not, under any circumstances, skip. Prepping the kayak. Yes, it’s a tad bit boring but boy oh boy, is it vital. You have to clean the kayak thoroughly. Why, you ask? Well, you want the paint to adhere properly and this won’t happen if there are oils, dirt, and whatnot on the kayak.
And then comes the fun part—painting! Go ahead, give free rein to your creativity. Freestyle it if you’re artistically inclined, or if you’re like me, keep it simple. Now remember, patience is your best friend at this stage. Apply thin coats and let each dry before slapping on the next. It’s tedious, I know, but you want this to last, right?
So there you have it — a basic guide on how to paint a kayak. It’s a fantastic little project that mixes DIY and the outdoors. Plus, it’s the perfect antidote for the all-too-common bouts of boredom we have recently been facing. Just… don’t forget to take a step back and admire your work once you’re done. Your kayak is a work of art now, after all!
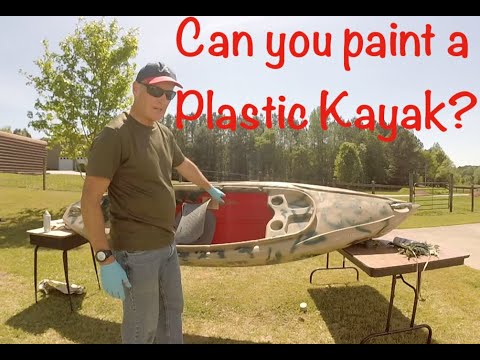
How Do You Spray Paint A Kayak Camo?

Alright, let’s dive right into this. There’s an undeniable appeal in customizing your own kayak with a bit of camo spray paint. Not only can it give your boat a tough, outdoorsy look, but it can also provide a touch of stealth if you’re out fishing or wildlife watching.
So, first things first, you’ll need to prep the kayak. Get it as clean as you can – soap, water, and elbow grease will do the trick, and make sure it’s absolutely dry before you start. Then, take a piece of sandpaper and give the entire surface a bit of a scuff. This isn’t about taking off any existing paint or finish, but rather about creating a ‘tooth’ for the new paint to stick to. Like trying to climb a smooth hill, it’s a slippery task without some grip, right?
Now, when picking out your paint, ensure it’s suitable for outdoor use and resistant to water. And remember to apply a primer before the main paint, okay? This will greatly improve the paint’s adhesion and provide an extra layer of protection.
With your primer thoroughly dried, you’re ready to begin applying your camo design. And here’s the fun part – you can be as creative as you want! Traditionally, camo is a blend of earth tones in a disruptive pattern, but there’s no fixed rule. Apply your lighter colors first (like a sandy beige), and proceed to darker tones, irregularly layering and misting them with your spray paint.
Last, but not least, protect your artistic endeavor with a clear coat finish. This will seal your paint job, boosting its durability and glossiness. Be sure to let that dry fully, and before you know it, you’ve got yourself a fabulous camo-painted kayak.
Don’t panic if it all sounds overwhelming. Every artist was once an amateur, so just have fun with it! After all, it ain’t the Mona Lisa – it’s your rugged, one-of-a-kind kayak.
How To Paint A Kayak With Acrylic Paint
Well hey there, my friends! I’m just dying to share some tips and tricks about painting your kayak with acrylic paint. Just a reminder, it’s a terrific way to personalize your vessel and it’s way easier than you might think.
-
First off, you have to prep your kayak. Clean it thoroughly, ensuring there’s no grime or dirt – these stubborn little rascals can mess with your paint job. And remember, any oil or wax from your kayak can make paint peel off, so scrub-a-dub-dub until it’s squeaky clean.
-
Now, onto the nitty gritty! Sanding your kayak. Make sure to use a mild grit sandpaper and, remember, you’re not carving a statue here, just roughening up the surface. This helps the primer and paint adhere better to your beloved boat.
-
Primer is the next step. It gives the paint a nice, smooth surface to stick to and helps the colour look more vibrant. I usually use a good quality, water-resistant primer but remember to check its compatibility with your paint.
-
Let’s get our hands dirty, folks. It’s time to paint! Acrylic paint is a fantastic choice for a kayak. It’s durable and water-resistant, making it a popular choice among us kayakers. Use a good quality brush. I’m talkin’ about one that won’t lose bristles and ruin your masterpiece.
-
Layering is the name of the game. Apply your paint in thin, even strokes. Patience is key here; let each layer dry before applying the next. I usually go for at least three layers to get that bright, bold colour.
-
This may seem like a dull step, but trust me, it’s not to be skimped on. Once your paint job looks like what you imagined, apply a clear, water-resistant sealant. It protects your artwork from scrapes and water damage while ensuring your coinage and time was money well spent.
-
Finally, let your work of art dry. I usually give it a few days. This is crucial as you don’t want water to ruin your hard work. Believe me, it’s worth the wait, and the result will be a unique kayak that turns heads.
Well, there we go, kiddos. Even though painting a kayak may seem like rocket science, it really isn’t, as long as you have the patience and follow the steps. Remember, a well-painted kayak not only looks fabulous but also increases its lifespan. So, what’re you waiting for? Pull up your socks and let your creativity ride the waves.
Can I Paint A Pvc Kayak?

Well, alright then, let’s dive right into it! So, you’re possibly pondering, “” You know what, the answer is a resounding yes! Believe it or not, painting your PVC kayak isn’t as daunting as it seems.
However, you should know that this task requires patience, the right materials, and the proper technique. First off, make sure to clean your kayak thoroughly before doing anything. Dirt or grime can interfere with the paint application, leading to an uneven finish.
Once your kayak is clean and dry, you’ll need to apply a primer. Primer is crucial as it creates a proper surface for the paint to stick to, so don’t be tempted to skip this step. After applying the primer, your kayak is ready for the real deal – the paint!
You can use a spray paint designed for plastic or a paint that’s specifically created for marine use. Whichever you choose, make sure to apply in thin, even layers for the best result. Finally, seal the paint with a clear coat to protect your kayak from the elements.
Remember, patience is vital; let all the layers dry completely before moving onto the next. Woah! You’ve done it! A brand-spanking new kayak is yours to enjoy. So bask in the glory of your beautiful creation.
What Is The Best Paint For A Fiberglass Kayak?
I’ll tell you, choosing the best paint for a fiberglass kayak isn’t as simple as it might seem. You might think you can just pick up any old can, but no sir. You need to consider your kayak’s surface, the type of paint’s adhesion strength, and the resistance to weather conditions. In my opinion, marine-grade paints are the cream of the crop for fiberglass kayaks.
Why, you ask? Well, these paints are specifically designed to stand up against harsh marine environments – they resist UV rays, salt water, and harsh weather conditions. That’s gold for your kayak’s longevity. Also, they adhere well to fiberglass. The best part? They’re easy to apply. Brands like TotalBoat, Rust-Oleum, or Interlux have some fantastic options for marine paints.
But, there’s more to it than just picking a good brand, pals. Let’s not forget about the finish – do you want a glossy or matte finish? A glossy finish has a nice shine under the sun, while a matte one offers a non-reflective surface. Both are beaut… , but it depends on what you’re after. If you kayak in a high-traffic area with many boats, a glossy finish might be safer for visibility purposes.
Lastly, and i can’t stress this enough, always remember to apply primer before the paint – it makes your color last longer, and who doesn’t love that? Now that we’ve got that sorted, grab your brushes and let’s get painting!
How To Paint A Kayak Professionally
My friends, have you ever looked at your old kayak and wished it could have a fresh, shiny paint job? I certainly have, and let me tell you, painting a kayak can be a fun and rewarding do-it-yourself project if you know the right techniques. So let’s dive right in!
-
Preparation is key: As with any painting job, the first step is to prepare the surface. This includes cleaning the kayak thoroughly, sanding it down to get rid of any blemishes or old paint, and drying it carefully before starting to paint. Trust me, you’d rather take your time with this step than rush it and end up regretting it later!
-
Choose the correct paint: It’s important to choose the right paint for the job. Regular household paint is not going to cut it in this case; you need something tough, waterproof and designed to stick to plastic or fiberglass, depending on your kayak’s material.
-
Apply primer: Once you’ve prepped the kayak, it’s time to apply a primer. This is crucial, as it provides a good base for the paint to stick to and ensures a smoother, more professional looking paint job. This also helps in protecting the kayak from elements.
-
Follow the correct painting process: Using a spray gun or paintbrush, apply the paint in short, even strokes, working in one direction. If you’re doing a pattern or using more than one color, make sure to use painter’s tape to create the outlines and remove it while the paint is still wet!
-
Apply multiple coats: You’ll likely need to apply several coats of paint to achieve a consistent and vibrant color. Patience is key here; wait until each coat has completely dried before applying the next one.
-
Seal the paint: After the final coat of paint has dried, you should finish with a clear sealant to protect the paint job. This will help it last longer and keep it looking fresh.
-
Leave it to dry: After you’ve finished painting and sealing, make sure to leave your kayak in a dry, dust-free space to ensure the perfect finish. Give it at least 24 hours to dry properly before use.
Remember painting a kayak isn’t rocket science, but doing it right takes a little knowledge and a lot of patience. By following these steps, you’ll be out on the water with your newly painted kayak in no time!
Can You Paint A Plastic Canoe?
Well, ain’t this a lovely question! It got me thinking back to my first time painting a kayak. A young whipper-snapper I was, eager to make my mark on my little canoe. I often find myself explaining the process to those who harbor similar ambitions, all the while sipping on a cup of hot coffee, my eye twinkling with nostalgia and knowledge!
Now, this might make you raise yer eyebrows, but the answer is a resounding—yes! You certainly can! However, it ain’t as simple as slapping on some paint and calling it a day, oh no! The trick lies in the prep work.
You see, plastic is a bit finicky when it comes to holding on to paint. This means that you’ve gotta put in a bit of elbow grease. Start by washing the canoe thoroughly. You’d be surprised how much grime can accumulate on it. Once it’s squeaky clean, hit it lightly with some sandpaper to scuff up that glossy surface so that the paint will have a better grip. Make sure you choose a paint that’s specifically designed for plastic—ain’t no sense in using the wrong type of paint!
Sounds a bit complicated, don’t it? However, when you’ve finished painting your canoe, you won’t be able to help but feel a sense of accomplishment as you gaze at your beautifully painted canoe. I bet ya the sight would be enough to knock you off your feet! At least, it was for me… Ah, those were the days!
How To Paint A Kayak Camo
Oh, don’t you just love the thrill of turning your dull and drab kayak into an appealing camo masterpiece? But where do you even start? Don’t fret – I’ve got you covered! Here’s a step-by-step guide on how to paint your kayak camo.
-
First things firsts – select your camouflage pattern. Yes, it’s actually a step. There are so many shades and patterns to pick from, including forest, desert, urban, and customized camo patterns, amongst others. Your environment and terrain play a major role at this point and remember, the aim is to blend in, not stand out!
-
Now you need to clean your kayak thoroughly. Any dust, grit or greases can interrupt the paint job causing it to be uneven or, even worse, making it easy to peel off. Use warm water, a soft cloth, and mild detergent – nothing too harsh!
-
Once you’ve cleaned your kayak, make sure to let it dry out completely. Pinch of patience required here! Remember any moisture can mess up your paint work and you don’t really want that, do you?
-
Don’t be too quick to bring out the paint brush just yet! You’ll need to sand down the surface of your kayak first. This helps the paint to adhere properly and leads to a smoother, more professional finish. A medium grit sandpaper will do just fine.
-
Now here’s a step you might’ve thought you could skip – applying a primer. Primer acts as a base for your paint, enhancing the color and providing a layer for the paint to key into, improving the longevity and durability of your work. Without this, your paint might just peel off into the water!
-
Once your primer has dried, you’re now good to go. Start painting! Be sure to apply thin coats of your chosen camouflage color one at a time, allowing each one to dry before applying another. This guarantees an even, lasting finish.
-
Give your paint job the desired pattern using stenciling techniques. Those can be easily ordered online or made with a bit of DIY spirit. After placing your stencils, hit them gently with another color of paint – usually black or really dark green – and voila, there’s your camo pattern!
-
To finish the job and add extra protection to your kayak, apply a clear finish or sealant. Preferably use a UV resistant one. This ensures your kayak can withstand the harshest weather conditions, without damaging your artistic effort.
Trust me, by the time you’re done with this, you’ll feel something akin to an accomplished artist. Remember, patience is key here – don’t rush the process! Your camo kayak will not only be a sight to behold, but you’ll also be able to sneak up on the fish and wildlife – or just hide from fellow paddlers!
Final Verdict
Alrighty then, here we are, the final verdict on how to paint your kayak properly. I must say, it’s been quite an adventure, haven’t we? Painting a kayak isn’t rocket science, but it does require patience and meticulous attention to detail. I can’t stress enough the importance of preparing your kayak for painting; every crevice and surface must be cleaned and sanded to perfection. Shouldn’t be cutting corners there, no sir!
Once your kayak’s surface is smooth and clean, a primer sealer is your best friend. That thing there creates a blank canvas for you to work with, and trust me – it’s worth every minute of your time. It’s not just a pretty face – it seals the surface, ensuring the paint adheres properly and lasts longer.
And then comes the fun part – painting! Deciding on a color can sometimes be a brain wrack, can’t it? Well, in my opinion, you should choose a color that suits you and your style. Plus, always make sure to use marine paint because it can withstand water damage and weathering.
Your strokes should be consistent, mate. Use a roller for large areas, and a brush for those hard-to-reach spots. Allow each coat to dry fully before applying the next one – patience, remember?
So, are we all clear now? I sure hope so. I believe painting your kayak, like any worthy endeavor, should be a labor of love. It’s something to be proud of – a reflection of yourself. So, yeah. There you have it, folks! The honest-to-goodness guide to painting a kayak!
Frequently Asked Questions
1. What kind of paint is appropriate to use for a kayak?
Ah, good question! You’ll want to use a paint that’s specifically made for marine use. This means it’s designed to withstand exposure to water and sun. Some popular ones are marine-grade enamel or polyurethane-based paint. They are resistant to saltwater, UV rays, and the harsh outdoor elements.
2. How do I prepare my kayak for painting?
Preparing the kayak is as important as the painting process itself! Start by cleaning it thoroughly with a mild detergent. Rinse it well and let it completely dry. You’ll then need to lightly sand the surface for the paint to adhere properly. Wipe down the sanded surface with a cloth to ensure it’s dust-free just before painting.
3. Do I need to prime my kayak before painting?
This is a yes-and-no situation. It depends on the type of kayak and paint you are using. If it’s a plastic kayak, a primer helps the paint adhere better. But for fiberglass kayaks, you can probably skip it. Yet, for a better finish and durability, I usually suggest going with a coat of primer.
4. Is spray paint safe to use on a kayak?
Absolutely! Spray paints can be a great choice, especially those specifically made for plastic or outdoor use. It gives a consistent, smooth finish and is relatively easy to apply. However, do remember to use a mask while spraying for safety reasons.
5. How many coats of paint should I apply to my kayak?
I’d recommend at least two coats for adequate coverage. But honestly, it depends on the type of paint and color you’re using. Some bright or lighter colors might need an extra coat or two for a solid finish.
6. How long does it take for the paint to dry on a kayak?
Ahh, the waiting game! It generally takes around 24-48 hours for the paint to dry completely. But this can vary depending on the weather and humidity levels. Always check the paint manufacturer’s instructions for the best results.
7. Do I need to seal the paint on my kayak?
You bet! After painting, it’s a good idea to add a clear coat sealer. This is an extra protective layer that boosts your paint’s longevity and gives it a glossy finish, making your kayak look brand new!
8. Can I use household paint to paint my kayak?
I wouldn’t recommend it. Household paint might not hold up well to prolonged exposure to water, sun, and scratches. Marine-grade paints or outdoor use paints are the safer bet!
9. Can I paint designs or patterns on my kayak?
Absolutely, let your creativity flow! Stencil or freehand, the sky’s the limit. Just make sure to use the same type of paint for consistency and remember to seal it afterward.
10. Is it necessary to repaint my kayak over time?
Well, it depends on how much wear and tear your kayak is exposed to. If the color is fading or you start to see scratches, then it might be time for a refresh!
Related Video